CSS Selectors
The element selector
The id selector
The class selector (for all elements)
The class selector (for only <p> elements)
Grouping selectors
CSS selectors explained
CSS Backgrounds
Set the background color of a page
Set the background color of different elements
Set an image as the background of a page
How to repeat a background image only horizontally
How to position a background image
A fixed background image (this image will not scroll with the rest of the page)
All the background properties in one declaration
Advanced background example
Background properties explained
CSS Text
Set the text color of different elements
Align the text
Remove the line under links
Decorate the text
Control the letters in a text
Indent text
Specify the space between characters
Specify the space between lines
Set the text direction of an element
Increase the white space between words
Disable text wrapping inside an element
Vertical alignment of an image inside text
Text properties explained
CSS Fonts
Set the font of a text
Set the size of the font
Set the size of the font in px
Set the size of the font in em
Set the size of the font in percent and em
Set the style of the font
Set the variant of the font
Set the boldness of the font
All the font properties in one declaration
Font properties explained
CSS Links
Add different colors to visited/unvisited links
Use of text-decoration on links
Specify a background color for links
Add other styles to hyperlinks
Advanced - Create link boxes
Link properties explained
CSS Lists
All the different list item markers in lists
Set an image as the list-item marker
Set an image as the list-item marker - Crossbrowser solution
All list properties in one declaration
List properties explained
CSS Tables
Specify a black border for table, th, and td elements
Use of border-collapse
Specify the width and height of a table
Set the horizontal alignment of content (text-align)
Set the vertical alignment of content (vertical-align)
Specify the padding for th and td elements
Specify the color of the table borders
Set the position of the table caption
Create a fancy table
Table properties explained
CSS Box Model
Specify an element with a total width of 250px
Box model explained
CSS Border
Set the width of the four borders
Set the width of the top border
Set the width of the bottom border
Set the width of the left border
Set the width of the right border
Set the style of the four borders
Set the style of the top border
Set the style of the bottom border
Set the style of the left border
Set the style of the right border
Set the color of the four borders
Set the color of the top border
Set the color of the bottom border
Set the color of the left border
Set the color of the right border
All the border properties in one declaration
Set different borders on each side
All the top border properties in one declaration
All the bottom border properties in one declaration
All the left border properties in one declaration
All the right border properties in one declaration
Border properties explained
CSS Outline
Draw a line around an element (outline)
Set the style of an outline
Set the color of an outline
Set the width of an outline
Outline properties explained
CSS Margin
Specify margins for an element
The margin shorthand property
Set the top margin of a text using a cm value
Set the bottom margin of a text using a percent value
Set the left margin of a text using a cm value
Margin properties explained
CSS Padding
Set the left padding of an element
Set the right padding of an element
Set the top padding of an element
Set the bottom padding of an element
All the padding properties in one declaration
Padding properties explained
CSS Dimension
Set the height of an image using a pixel value
Set the height of an image using percent
Set the width of an element using a pixel value
Set the maximum height of an element
Set the maximum width of an element using a pixel value
Set the maximum width of an element using percent
Set the minimum height of an element
Set the minimum width of an element using a pixel value
Set the minimum width of an element using percent
Dimension properties explained
CSS Display
How to hide an element (visibility:hidden)
How to not display an element (display:none)
How to display an element as an inline element
How to display an element as a block element
How to make a table element collapse
Display properties explained
CSS Positioning
Position an element relative to the browser window
Position an element relative to its normal position
Position an element with an absolute value
Overlapping elements
Set the shape of an element
How to create a scroll bar when an element's content is too big to fit
How to set the browser to automatically handle overflow
Set the top edge of an image using a pixel value
Set the bottom edge of an image using a pixel value
Set the left edge of an image using a pixel value
Set the right edge of an image using a pixel value
Change the cursor
Positioning properties explained
CSS Floating
A simple use of the float property
An image with border and margins that floats to the right in a paragraph
An image with a caption that floats to the right
Let the first letter of a paragraph float to the left
Create an image gallery with the float property
Turning off float (using the clear property)
Creating a horizontal menu
Creating a homepage without tables
Float properties explained
CSS Aligning Elements
Center aligning with margin
Left/Right aligning with position
Left/Right aligning with position - Crossbrowser solution
Left/Right aligning with float
Left/Right aligning with float - Crossbrowser solution
Align properties explained
CSS Combinators
Descendant selector
Child selector
Adjacent Sibling selector
General Sibling selector
Combinator selectors explained
CSS Generated Content
Insert the URL in parenthesis after each link with the content property
Numbering sections and sub-sections with "Section 1", "1.1", "1.2", etc.
Specify the quotation marks with the quotes property
CSS Pseudo-classes
Add different colors to a hyperlink
Add other styles to hyperlinks
Use of :focus
:first-child - match the first p element
:first-child - match the first i element in all p elements
:first-child - Match all i elements in all first child p elements
Use of :lang
Pseudo-classes explained
CSS Pseudo-elements
Make the first letter special in a text
Make the first line special in a text
Make the first letter and first line special
Use :before to insert some content before an element
Use :after to insert some content after an element
Pseudo-elements explained
CSS Navigation Bars
Fully styled vertical navigation bar
Fully styled horizontal navigation bar
Navigation bars explained
CSS Image Gallery
Image gallery
Image gallery explained
CSS Image Opacity
Creating transparent images - mouseover effect
Creating a transparent box with text on a background image
Image opacity explained
CSS Image Sprites
An image sprite
An image sprite - a navigation list
An image sprite with hover effect
Image sprites explained
CSS Attribute Selectors
Selects all <a> elements with a target attribute
Selects all <a> elements with a target="_blank" attribute
Selects all elements with a title attribute that contains a space-separated list of words, one of which is "flower"
Selects all elements with a class attribute value that begins with "top" (must be whole word)
Selects all elements with a class attribute value that begins with "top" (must not be whole word)
Selects all elements with a class attribute value that ends with "test"
Selects all elements with a class attribute value that contains "te"
Attribute selectors explained
CSS3 Borders
Add rounded corners to an element
Add a box-shadow to an element
Use an image to create a border around an element
CSS3 borders explained
CSS3 Backgrounds
Resize a background image
Stretch background image to completely fill the content area
Position the background image within the content-box
Set multiple background images for an element
CSS3 backgrounds explained
CSS3 Gradients
Linear Gradient - top to bottom
Linear Gradient - left to right
Linear Gradient - diagonal
Linear Gradient - with a specified angle
Linear Gradient - with multiple color stops
Linear Gradient - color of a rainbow + text
Linear Gradient - with transparency
Linear Gradient - a repeating linear gradient
Radial Gradient - evenly spaced color stops
Radial Gradient - differently spaced color stops
Radial Gradient - set shape
Radial Gradient - different size keywords
Radial Gradient - a repeating radial gradient
CSS3 gradients explained
CSS3 Text Effects
Add shadow to text
Allow long words to be able to break and wrap onto the next line
CSS3 text effects explained
CSS3 Fonts
Use your "own" fonts in @font-face rule
Use your "own" fonts in @font-face rule (bold)
CSS3 fonts explained
CSS3 2D Transforms
translate() - move element from its current position
rotate() - rotate element
scale() - scale element (increase/decrease)
skew() - turn element in a given angle
matrix() - rotate, scale, move (translate), and skew element
CSS3 2D transforms explained
CSS3 3D Transforms
rotateX() - rotate element around its X-axis at a given degree
rotateY() - rotate element around its Y-axis at a given degree
CSS3 3D transforms explained
CSS3 Transitions
Transition effect - change width
Transition effect - change width, height, transform
All transition properties in one example
All transition properties in one (shorthand method)
CSS3 transitions explained
CSS3 Animations
Bind an animation to an element
Animation - change background color
Animation - change background color and position
CSS3 animations explained
CSS3 Multiple Columns
Divide the text in a div element into columns
Specify the gap between columns
Specify the width, style and color of the rule between columns
CSS3 multiple columns explained
CSS3 User Interface
resize property - Make an element resizable by the user
box-sizing property - Create two bordered boxes side by side
outline-offset property - offset an outline
CSS3 user interface explained
All css and css3 for css tools and css3 tools with css code generator and css3 code generator. All css generator and css3 generator for css button gerator and css3 button generator, css gradient generator and css3 gradient generator, css menu maker and css menu maker, css button maker and css3 button maker other help css editor and css3 editor.

Friday, June 27, 2014
Intelligent Web Design Learning
Video Blog – Intelligent Web Design Learning
https://www.youtube.com/watch?v=pT1s1q_NT8s
In this video blog, Stefan goes over 2 major points:
1. Don’t get caught up in nerd-theory rabbit holes, that
take up all your time on things that will have little to no impact on your
day-to-day web
programming or designing work.
2. Learn your nerd craft by creating things that people
commonly want … things like shopping
carts, customizing
a blog etc …
- See more at:
http://www.csstutorial.net/2011/02/video-blog-intelligent-web-design-learning/#sthash.McAPcCbj.dpuf
All css and css3 for css tools and css3 tools with css code generator and css3 code generator. All css generator and css3 generator for css button gerator and css3 button generator, css gradient generator and css3 gradient generator, css menu maker and css menu maker, css button maker and css3 button maker other help css editor and css3 editor.
All css and css3 for css tools and css3 tools with css code generator and css3 code generator. All css generator and css3 generator for css button gerator and css3 button generator, css gradient generator and css3 gradient generator, css menu maker and css menu maker, css button maker and css3 button maker other help css editor and css3 editor.
HTML5, CSS3 and jQuery Training Video – Basic HTML
In this video tutorial from our HTML5, CSS3 and jQuery
Course, we go over some more basic HTML. - See more at:
http://www.csstutorial.net/2012/04/html5-css3-and-jquery-training-video-basic-html/#sthash.a72v4SkX.dpuf
Note that all of our videos are in a higher quality when
purchased from our Killer Video
Store or by subscription to our Video Tutorial Library!
Thanks,
- See more at:
http://www.csstutorial.net/2012/04/html5-css3-and-jquery-training-video-basic-html/#sthash.a72v4SkX.dpuf
Sunday, June 15, 2014
Ten of the Best CSS3 Code Generators
I have rose-tinted memories of CSS2.1. Rounded corners may have
caused hours of Photoshopping grief, but it was simple. Most developers
could recall the few dozen properties without referring to reference
books every two minutes.
CSS3 changes everything. There are 116 new properties* with multiple vendor prefixes and different syntaxes. No one could be expect you to memorize everything. Fortunately, there are a number on free online tools which will help you create modern CSS3 code to cut and paste into your stylesheets…
 Create your own website for
free using code generator is nowadays a demand of youngsters. So, they can
easily make their website without going deep in languages. Create your own
website for free using code generator is an upcoming idea in this field of
technology. It is an incomparable website builder that permits you to easily
make your personal, unique and fully in working order website, free of charge.
Create your own website for
free using code generator is nowadays a demand of youngsters. So, they can
easily make their website without going deep in languages. Create your own
website for free using code generator is an upcoming idea in this field of
technology. It is an incomparable website builder that permits you to easily
make your personal, unique and fully in working order website, free of charge.
 CSS 3.0 Maker is a fabulous tool. You can define box radii,
gradients, text shadows, box shadows, transforms, transitions and
rotations by adjusting a few sliders. A preview area shows the result
and indicates which desktop and mobile browsers support the properties.
CSS 3.0 Maker is a fabulous tool. You can define box radii,
gradients, text shadows, box shadows, transforms, transitions and
rotations by adjusting a few sliders. A preview area shows the result
and indicates which desktop and mobile browsers support the properties.
CSS code can be copied from the Codeview box and downloaded within an HTML file which demonstrates the effect.
 Photoshop users will love LayerStyles. CSS3 effects are defined using
a layer style dialog which will be immediately familiar to anyone using
Adobe products. It’s easy, logical, and a joy to use.
Photoshop users will love LayerStyles. CSS3 effects are defined using
a layer style dialog which will be immediately familiar to anyone using
Adobe products. It’s easy, logical, and a joy to use.
Code can be copied from the dynamically-updated “CSS Code” viewer in the bottom-left of the screen.
 CSS3 Generator uses a wizard-like approach to define styles. Choose
from a variety of effects including border radius, text shadow, box
shadow, multiple columns, transforms and transitions. Then, complete a
few boxes to apply them to the preview element.
CSS3 Generator uses a wizard-like approach to define styles. Choose
from a variety of effects including border radius, text shadow, box
shadow, multiple columns, transforms and transitions. Then, complete a
few boxes to apply them to the preview element.
CSS3 Generator highlights which browsers and versions support the effect and, where possible, provides IE-specific filter code.
 The sandbox has been developed by CSS3 guru and SitePoint contributer
John Allsopp. Gradients, text effects, box properties and transforms
can be easily adjusted using sliders. The resulting code and preview
window is dynamically updated accordingly.
The sandbox has been developed by CSS3 guru and SitePoint contributer
John Allsopp. Gradients, text effects, box properties and transforms
can be easily adjusted using sliders. The resulting code and preview
window is dynamically updated accordingly.
The tool may not be as pretty as some of its competitors but it’s quick and functional. Recommended.
 CSS3 Playground has been created by freelance developer Mike Plate.
As well as supporting a range of CSS3 properties, it’s the only tool
which allows you to preview effects on more than one element and change
the content of the boxes. Amazing.
CSS3 Playground has been created by freelance developer Mike Plate.
As well as supporting a range of CSS3 properties, it’s the only tool
which allows you to preview effects on more than one element and change
the content of the boxes. Amazing.
 If you want something simple, quick and easy, this CSS3 generator
could be the tool for you. It’s one of the best-looking utilities and
supports border radius, box shadow, opacity and simple background
gradients. You can also request IE-specific filters in the resulting
code.
If you want something simple, quick and easy, this CSS3 generator
could be the tool for you. It’s one of the best-looking utilities and
supports border radius, box shadow, opacity and simple background
gradients. You can also request IE-specific filters in the resulting
code.
 As well as providing cross-browser CSS3 code, the tool allows you to
store and share styles with others. You can browse showcased buttons and
adjust the properties for your own use.
As well as providing cross-browser CSS3 code, the tool allows you to
store and share styles with others. You can browse showcased buttons and
adjust the properties for your own use.
 Button Maker doesn’t support some of the more extreme CSS3 properties but it’s one of the only tools to show hover effects.
Ultimate CSS Gradient Generator
If pushed, even I can recall the text-shadow property. CSS3 gradients? No chance. Gradients may be powerful but they’re convoluted
and, until recently, webkit browsers used a different syntax. Unless
you’re creating a very simple background, a gradient generator is
essential.
The Ultimate CSS Gradient Generator is, well, the ultimate gradient generator. It uses a similar interface to Photoshop and creates cross-browser code which includes IE filters. Finally, gradients can be saved and shared with a unique link. You’ll definitely want to bookmark this tool.
 Have I missed your favorite CSS3 code generator?
* That number of new properties is entirely made up. I’ve no idea whether it’s correct but it sounded reasonable. I doubt anyone will refute it … unless there are any CSS pedants with a few hours to spare?
If you enjoyed reading this post, you’ll love Learnable; the place to learn fresh skills and techniques from the masters. Members get instant access to all of SitePoint’s ebooks and interactive online courses, like Learn CSS3.
And if you enjoyed reading this post, you’ll love Learnable; the place to learn fresh skills and techniques from the masters. Members get instant access to all of SitePoint’s ebooks and interactive online courses, like Learn CSS3.
Comments on this article are closed. Have a question about CSS3? Why not ask it on our forums?
CSS3 changes everything. There are 116 new properties* with multiple vendor prefixes and different syntaxes. No one could be expect you to memorize everything. Fortunately, there are a number on free online tools which will help you create modern CSS3 code to cut and paste into your stylesheets…
CSS3 Generator:
Our compelling technology
makes up it easy for everybody to go on cyberspace with an attractive,
professional and running cyberspace presence. No originative limits, no
encoding, nothing just utter freedom to convey yourself and grapple your whole
business on cyberspace. Our worldwide user base makes to create your own
website for free using code generator and unique design potentialities to make
an unusual ecosystem. Mates, developers, online designers and additional online
masters can efficaciously commercialize their applications and services to
billions through our website.
Website codemaker grants
billions of people an astonishingly easy and inexpensive way to make an
internet site that is as unparalleled as they are. Create your own website forfree using code generator internet site, people can commence their personal
business, intercommunicate with their customers, showcase their accomplishments
and be an authorization on individual and professional concerns.
Our website codemakergenerates everybody the freedom to commence an internet site, web log or
internet store that exercises brightly across computers, cell phones and
tablets. Website codemaker has everything you want to design, build, bring out
and spring up an internet web site that fills your goals.
We assure that whether you
are a small-scale business proprietor, a non-profit-making, or just prefer to
make a marriage internet site, a resume internet site, a portfolio internet
site, or some sort of internet site at all, we will assist you get it executed.
It is very speedy and easy.
We are pretty meek, but we
are as well implausibly proud of having made an A-one internet site building
service that’s among the finest in the world. Merely ask our clients. And we
are all of the time acting to make our website codemaker even finer. But do not
accept our word for it. Test it and determine for yourself. It is absolutely
free.
Although the technology
betting on it up is compelling and difficult, we established our platform easy
for everybody to use. We are prepared to grip the adept like a big inflow of
hits to your internet site. We are as well preparing to cope with the not very
good.
CSS 3.0 Maker
 CSS 3.0 Maker is a fabulous tool. You can define box radii,
gradients, text shadows, box shadows, transforms, transitions and
rotations by adjusting a few sliders. A preview area shows the result
and indicates which desktop and mobile browsers support the properties.
CSS 3.0 Maker is a fabulous tool. You can define box radii,
gradients, text shadows, box shadows, transforms, transitions and
rotations by adjusting a few sliders. A preview area shows the result
and indicates which desktop and mobile browsers support the properties.CSS code can be copied from the Codeview box and downloaded within an HTML file which demonstrates the effect.
LayerStyles.org
 Photoshop users will love LayerStyles. CSS3 effects are defined using
a layer style dialog which will be immediately familiar to anyone using
Adobe products. It’s easy, logical, and a joy to use.
Photoshop users will love LayerStyles. CSS3 effects are defined using
a layer style dialog which will be immediately familiar to anyone using
Adobe products. It’s easy, logical, and a joy to use.Code can be copied from the dynamically-updated “CSS Code” viewer in the bottom-left of the screen.
CSS3 Generator
 CSS3 Generator uses a wizard-like approach to define styles. Choose
from a variety of effects including border radius, text shadow, box
shadow, multiple columns, transforms and transitions. Then, complete a
few boxes to apply them to the preview element.
CSS3 Generator uses a wizard-like approach to define styles. Choose
from a variety of effects including border radius, text shadow, box
shadow, multiple columns, transforms and transitions. Then, complete a
few boxes to apply them to the preview element.CSS3 Generator highlights which browsers and versions support the effect and, where possible, provides IE-specific filter code.
westciv CSS3 Sandbox

The tool may not be as pretty as some of its competitors but it’s quick and functional. Recommended.
CSS3 Playground

CSS3.me
 If you want something simple, quick and easy, this CSS3 generator
could be the tool for you. It’s one of the best-looking utilities and
supports border radius, box shadow, opacity and simple background
gradients. You can also request IE-specific filters in the resulting
code.
If you want something simple, quick and easy, this CSS3 generator
could be the tool for you. It’s one of the best-looking utilities and
supports border radius, box shadow, opacity and simple background
gradients. You can also request IE-specific filters in the resulting
code.CSS3 Button Generator
CSS3 effects can produce great-looking buttons without images. The CSS3 Button Generator allows you to tweak the font, padding, border, background gradient, inner shadow, drop shadow and text shadows using up/down controls which can be easier and more logical than sliders. As well as providing cross-browser CSS3 code, the tool allows you to
store and share styles with others. You can browse showcased buttons and
adjust the properties for your own use.
As well as providing cross-browser CSS3 code, the tool allows you to
store and share styles with others. You can browse showcased buttons and
adjust the properties for your own use.CSS Tricks Button Maker
CSS3 Button Maker was developed by Chris Coyier of CSS Tricks. Although it was intended as a technology demonstration, that hasn’t prevented it being useful to CSS3 developers! Button Maker doesn’t support some of the more extreme CSS3 properties but it’s one of the only tools to show hover effects.
Ultimate CSS Gradient Generator
If pushed, even I can recall the text-shadow property. CSS3 gradients? No chance. Gradients may be powerful but they’re convoluted
and, until recently, webkit browsers used a different syntax. Unless
you’re creating a very simple background, a gradient generator is
essential.The Ultimate CSS Gradient Generator is, well, the ultimate gradient generator. It uses a similar interface to Photoshop and creates cross-browser code which includes IE filters. Finally, gradients can be saved and shared with a unique link. You’ll definitely want to bookmark this tool.
CSS3 Gradient Generator
If the Ultimate CSS Gradient Generator is too much effort, you might prefer this alternative. The tool allows you to create linear gradients by adding colors at any number of stop points. The old webkit syntax is produced as well as Mozilla code which should be compatible with other browsers. Have I missed your favorite CSS3 code generator?
* That number of new properties is entirely made up. I’ve no idea whether it’s correct but it sounded reasonable. I doubt anyone will refute it … unless there are any CSS pedants with a few hours to spare?
If you enjoyed reading this post, you’ll love Learnable; the place to learn fresh skills and techniques from the masters. Members get instant access to all of SitePoint’s ebooks and interactive online courses, like Learn CSS3.
And if you enjoyed reading this post, you’ll love Learnable; the place to learn fresh skills and techniques from the masters. Members get instant access to all of SitePoint’s ebooks and interactive online courses, like Learn CSS3.
Comments on this article are closed. Have a question about CSS3? Why not ask it on our forums?
Saturday, June 14, 2014
CSS Attribute Selectors
Style HTML Elements With Specific Attributes
It is possible to style HTML elements that have specific attributes, not just class and id.
 |
Note: IE7 and IE8 support attribute selectors only if a !DOCTYPE is specified. |
|---|
CSS [attribute] Selector
The [attribute] selector is used to select elements with the specified attribute.The following example selects all <a> elements with a target attribute:
CSS [attribute=value] Selector
The [attribute=value] selector is used to select elements with the specified attribute and value.The following example selects all <a> elements with a target="_blank" attribute:
CSS [attribute~=value] Selector
The [attribute~=value] selector is used to select elements with an attribute value containing a specified word.The following example selects all elements with a title attribute that contains a space-separated list of words, one of which is "flower":
The example above will match elements with title="flower", title="summer flower", and title="flower new", but not title="my-flower" or title="flowers".
CSS [attribute|=value] Selector
The [attribute|=value] selector is used to select elements with the specified attribute starting with the specified value.The following example selects all elements with a class attribute value that begins with "top":
Note: The value has to be a whole word, either alone, like class="top", or followed by a hyphen( - ), like class="top-text"!
CSS [attribute^=value] Selector
The [attribute^=value] selector is used to select elements whose attribute value begins with a specified value.The following example selects all elements with a class attribute value that begins with "top":
Note: The value does not have to be a whole word!
CSS [attribute$=value] Selector
The [attribute$=value] selector is used to select elements whose attribute value ends with a specified value.The following example selects all elements with a class attribute value that ends with "test":
Note: The value does not has to be a whole word!
CSS [attribute*=value] Selector
The [attribute*=value] selector is used to select elements whose attribute value contains a specified value.The following example selects all elements with a class attribute value that contains "te":
Note: The value does not has to be a whole word!
Styling Forms
The attribute selectors can be useful for styling forms without class or ID:Example
input[type="text"]
{
width: 150px;
display: block;
margin-bottom: 10px;
background-color: yellow;
}
input[type="button"] {
width: 120px;
margin-left: 35px;
display: block;
}
width: 150px;
display: block;
margin-bottom: 10px;
background-color: yellow;
}
input[type="button"] {
width: 120px;
margin-left: 35px;
display: block;
}
Try it yourself »
More Examples of CSS Selectors
Use our CSS Selector Tester to demonstrate the different selectors.For a complete reference of all the CSS selectors, please go to our CSS Selectors Reference.
CSS Media Types
By using the @media rule, a website can have a different layout for screen,
print, mobile phone, tablet, etc.
Media Types

Some CSS properties are only designed for a certain media. For example the
"voice-family" property is designed for aural user agents. Some other
properties can be used for different media types. For example, the
"font-size" property can be used for both screen and print media, but
perhaps with different values. A document usually needs a larger font-size on a
screen than on paper, and sans-serif fonts are easier to read on the screen, while
serif fonts are easier to read on paper.
The @media Rule
The @media rule allows different style rules for different media in the same style sheet.The style in the example below tells the browser to display a 14 pixels Veranda font on the screen. But if the page is printed, it will be in a 20 pixels font, and in a red color:
Example
@media screen {
p {
font-family: verdana,sans-serif;
font-size: 14px;
}
}
@media print {
p {
font-size: 20px;
color: red;
}
}
p {
font-family: verdana,sans-serif;
font-size: 14px;
}
}
@media print {
p {
font-size: 20px;
color: red;
}
}
Try it yourself »
Other Media Types
| Media Type | Description | ||||||||||||||||||||
|---|---|---|---|---|---|---|---|---|---|---|---|---|---|---|---|---|---|---|---|---|---|
| all | Used for all media type devices | ||||||||||||||||||||
| aural | Used for speech and sound synthesizers | ||||||||||||||||||||
| braille | Used for braille tactile feedback devices | ||||||||||||||||||||
| embossed | Used for paged braille printers | ||||||||||||||||||||
| handheld | Used for small or handheld devices | ||||||||||||||||||||
| Used for printers | |||||||||||||||||||||
| projection | Used for projected presentations, like slides | ||||||||||||||||||||
| screen | Used for computer screens | ||||||||||||||||||||
| tty | Used for media using a fixed-pitch character grid, like teletypes and terminals | ||||||||||||||||||||
| tv | Used for television-type devices |
CSS Image Opacity / Transparency
Creating transparent images with CSS is easy.
The CSS opacity property is a part of the W3C CSS3 recommendation.
Example 1 - Creating a Transparent Image
The CSS3 property for transparency is opacity.First we will show you how to create a transparent image with CSS.
Regular image:
 The same image with transparency:
Look at the following CSS:
The same image with transparency:
Look at the following CSS:
img
{
opacity: 0.4;
filter: alpha(opacity=40); /* For IE8 and earlier */
}
opacity: 0.4;
filter: alpha(opacity=40); /* For IE8 and earlier */
}
IE8 and earlier use filter:alpha(opacity=x). The x can take a value from 0 - 100. A lower value makes the element more transparent.
Example 2 - Image Transparency - Hover Effect
Mouse over the images:
 The CSS looks like this:
Example
img
{
opacity: 0.4;
filter: alpha(opacity=40); /* For IE8 and earlier */
}
img:hover {
opacity: 1.0;
filter: alpha(opacity=100); /* For IE8 and earlier */
}
opacity: 0.4;
filter: alpha(opacity=40); /* For IE8 and earlier */
}
img:hover {
opacity: 1.0;
filter: alpha(opacity=100); /* For IE8 and earlier */
}
Try it yourself »
The CSS for this is: opacity=1.
IE8 and earlier: filter:alpha(opacity=100).
When the mouse pointer moves away from the image, the image will be transparent again.
Example 3 - Text in Transparent Box
This is some text that is placed in the transparent box. This is some
text that is placed in the transparent box. This is some text that is
placed in the transparent box. This is some text that is placed in the
transparent box. This is some text that is placed in the transparent
box.
Example
<html>
<head>
<style>
div.background {
width: 500px;
height: 250px;
background: url(klematis.jpg) repeat;
border: 2px solid black;
}
div.transbox {
width: 400px;
height: 180px;
margin: 30px 50px;
background-color: #ffffff;
border: 1px solid black;
opacity: 0.6;
filter: alpha(opacity=60); /* For IE8 and earlier */
}
div.transbox p {
margin: 30px 40px;
font-weight: bold;
color: #000000;
}
</style>
</head>
<body>
<div class="background">
<div class="transbox">
<p>This is some text that is placed in the transparent box.
This is some text that is placed in the transparent box.
This is some text that is placed in the transparent box.
This is some text that is placed in the transparent box.
This is some text that is placed in the transparent box.</p>
</div>
</div>
</body>
</html>
Try it yourself »
All css and css3 for css tools and css3 tools with css code generator and css3 code generator. All css generator and css3 generator for css button gerator and css3 button generator, css gradient generator and css3 gradient generator, css menu maker and css menu maker, css button maker and css3 button maker other help css editor and css3 editor.
CSS Image Gallery
CSS can be used to create an image gallery.
 Image Gallery
The following image gallery is created with CSS:
Example
<html>
<head>
<style>
div.img {
margin: 5px;
padding: 5px;
border: 1px solid #0000ff;
height: auto;
width: auto;
float: left;
text-align: center;
}
div.img img {
display: inline;
margin: 5px;
border: 1px solid #ffffff;
}
div.img a:hover img {
border:1px solid #0000ff;
}
div.desc {
text-align: center;
font-weight: normal;
width: 120px;
margin: 5px;
}
</style>
</head>
<body>
<div class="img">
<a target="_blank" href="klematis_big.htm">
<img src="klematis_small.jpg" alt="Klematis" width="110" height="90">
</a>
<div class="desc">Add a description of the image here</div>
</div>
<div class="img">
<a target="_blank" href="klematis2_big.htm">
<img src="klematis2_small.jpg" alt="Klematis" width="110" height="90">
</a>
<div class="desc">Add a description of the image here</div>
</div>
<div class="img">
<a target="_blank" href="klematis3_big.htm">
<img src="klematis3_small.jpg" alt="Klematis" width="110" height="90">
</a>
<div class="desc">Add a description of the image here</div>
</div>
<div class="img">
<a target="_blank" href="klematis4_big.htm">
<img src="klematis4_small.jpg" alt="Klematis" width="110" height="90">
</a>
<div class="desc">Add a description of the image here</div>
</div>
</body>
</html>
Try it yourself »
All css and css3 for css tools and css3 tools with css code generator and css3 code generator. All css generator and css3 generator for css button gerator and css3 button generator, css gradient generator and css3 gradient generator, css menu maker and css menu maker, css button maker and css3 button maker other help css editor and css3 editor.
CSS Navigation Bar
Navigation Bars

Having easy-to-use navigation is important for any web site.
With CSS you can transform boring HTML menus into good-looking navigation bars.
Navigation Bar = List of Links
A navigation bar needs standard HTML as a base.In our examples we will build the navigation bar from a standard HTML list.
A navigation bar is basically a list of links, so using the <ul> and <li> elements makes perfect sense:
Example
<ul>
<li><a href="default.asp">Home</a></li>
<li><a href="news.asp">News</a></li>
<li><a href="contact.asp">Contact</a></li>
<li><a href="about.asp">About</a></li>
</ul>
<li><a href="default.asp">Home</a></li>
<li><a href="news.asp">News</a></li>
<li><a href="contact.asp">Contact</a></li>
<li><a href="about.asp">About</a></li>
</ul>
Try it yourself »
Example explained:
- list-style-type: none - Removes the bullets. A navigation bar does not need list markers
- Setting margins and padding to 0 to remove browser default settings
Vertical Navigation Bar
To build a vertical navigation bar we only need to style the <a> elements, in addition to the code above:Example explained:
- display: block - Displaying the links as block elements makes the whole link area clickable (not just the text), and it allows us to specify the width
- width: 60px - Block elements take up the full width available by default. We want to specify a 60 px width
|
Note: Always specify the width for <a> elements in a vertical navigation bar. If you omit the width, IE6 can produce unexpected results. |
|---|
Horizontal Navigation Bar
There are two ways to create a horizontal navigation bar. Using inline or floating list items.Both methods work fine, but if you want the links to be the same size, you have to use the floating method.
Inline List Items
One way to build a horizontal navigation bar is to specify the <li> elements as inline, in addition to the "standard" code above:Example explained:
- display: inline; - By default, <li> elements are block elements. Here, we remove the line breaks before and after each list item, to display them on one line
Floating List Items
In the example above the links have different widths.For all the links to have an equal width, float the <li> elements and specify a width for the <a> elements:
Example explained:
- float: left - use float to get block elements to slide next to each other
- display: block - Displaying the links as block elements makes the whole link area clickable (not just the text), and it allows us to specify the width
- width: 60px - Since block elements take up the full width available, they cannot float next to each other. We specify the width of the links to 60px
CSS Pseudo~elements
CSS pseudo-elements are used to add special effects to some selectors.
 Syntax
The syntax of pseudo-elements: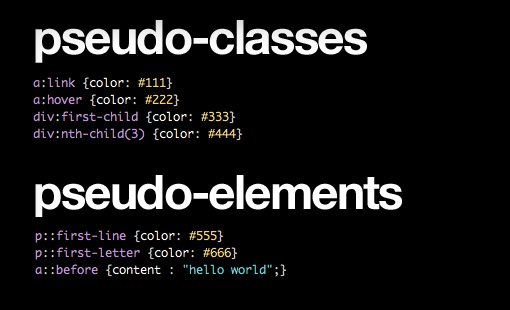
selector::pseudo-element {
property:value;
}
property:value;
}
selector.class::pseudo-element {
property:value;
}
property:value;
}
The ::first-line Pseudo-element
The ::first-line pseudo-element is used to add a special style to the first line of a text.The ::first-line pseudo-element can only be applied to block-level elements.
Example
Format the first line of the text in p
elements:
p::first-line
{
color: #ff0000;
font-variant: small-caps;
}
color: #ff0000;
font-variant: small-caps;
}
Try it yourself »
- font properties
- color properties
- background properties
- word-spacing
- letter-spacing
- text-decoration
- vertical-align
- text-transform
- line-height
- clear
The ::first-letter Pseudo-element
The ::first-letter pseudo-element is used to add a special style to the first letter of a text.The ::first-letter pseudo-element can only be applied to block-level elements.
Example
Format the first letter of the text in p elements:
p::first-letter
{
color: #ff0000;
font-size: xx-large;
}
color: #ff0000;
font-size: xx-large;
}
Try it yourself »
- font properties
- color properties
- background properties
- margin properties
- padding properties
- border properties
- text-decoration
- vertical-align (only if "float" is "none")
- text-transform
- line-height
- float
- clear
Pseudo-elements and CSS Classes
Pseudo-elements can be combined with CSS classes:
CSS:
p.article::first-letter {color:#ff0000;}
HTML:
<p class="article">A paragraph in an article</p>
p.article::first-letter {color:#ff0000;}
HTML:
<p class="article">A paragraph in an article</p>
Multiple Pseudo-elements
Several pseudo-elements can also be combined.
In the following example, the first letter of a paragraph will be red, in
an xx-large font size. The rest of the first line will be blue, and in
small-caps. The rest of the paragraph will be the default font size and color:
Example
p::first-letter
{
color: #ff0000;
font-size: xx-large;
}
p::first-line {
color: #0000ff;
font-variant: small-caps;
}
color: #ff0000;
font-size: xx-large;
}
p::first-line {
color: #0000ff;
font-variant: small-caps;
}
Try it yourself »
CSS - The ::before Pseudo-element
The ::before pseudo-element can be used to insert some content before the content of an element.The following example inserts an image before each <h1> element:
CSS - The ::after Pseudo-element
The ::after pseudo-element can be used to insert some content after the content of an element.The following example inserts an image after each <h1> element:
All CSS Pseudo Classes/Elements
| Selector | Example | Example description | ||||||||
|---|---|---|---|---|---|---|---|---|---|---|
| :link | a:link | Selects all unvisited links | ||||||||
| :visited | a:visited | Selects all visited links | ||||||||
| :active | a:active | Selects the active link | ||||||||
| :hover | a:hover | Selects links on mouse over | ||||||||
| :focus | input:focus | Selects the input element which has focus | ||||||||
| ::first-letter | p::first-letter | Selects the first letter of every <p> element | ||||||||
| ::first-line | p::first-line | Selects the first line of every <p> element | ||||||||
| :first-child | p:first-child | Selects every <p> elements that is the first child of its parent | ||||||||
| ::before | p::before | Insert content before every <p> element | ||||||||
| ::after | p::after | Insert content after every <p> element | ||||||||
| :lang(language) | p:lang(it) | Selects every <p> element with a lang attribute value starting with "it" |
CSS Pseudo-classes

Syntax
The syntax of pseudo-classes:
selector:pseudo-class {
property:value;
}
property:value;
}
selector.class:pseudo-class {
property:value;
}
property:value;
}
Anchor Pseudo-classes
Links can be displayed in different ways in a CSS-supporting browser:Example
/* unvisited link */
a:link {
color: #FF0000;
}
/* visited link */
a:visited {
color: #00FF00;
}
/* mouse over link */
a:hover {
color: #FF00FF;
}
/* selected link */
a:active {
color: #0000FF;
}
a:link {
color: #FF0000;
}
/* visited link */
a:visited {
color: #00FF00;
}
/* mouse over link */
a:hover {
color: #FF00FF;
}
/* selected link */
a:active {
color: #0000FF;
}
Try it yourself »
|
Note: a:hover MUST come after a:link and a:visited in the CSS definition in order to be effective!! a:active MUST come after a:hover in the CSS definition in order to be effective!! Pseudo-class names are not case-sensitive. |
|---|
Pseudo-classes and CSS Classes
Pseudo-classes can be combined with CSS classes:CSS - The :first-child Pseudo-class
The :first-child pseudo-class matches a specified element that is the first child of another element. |
Note: For :first-child to work in IE8 and earlier, a <!DOCTYPE> must be declared. |
|---|
Match the first <p> element
In the following example, the selector matches any <p> element that is the first child of any element:Example
<html>
<head>
<style>
p:first-child {
color: blue;
}
</style>
</head>
<body>
<p>I am a strong man.</p>
<p>I am a strong man.</p>
</body>
</html>
<head>
<style>
p:first-child {
color: blue;
}
</style>
</head>
<body>
<p>I am a strong man.</p>
<p>I am a strong man.</p>
</body>
</html>
Try it yourself »
Match the first <i> element in all <p> elements
In the following example, the selector matches the first <i> element in all <p> elements:Example
<html>
<head>
<style>
p > i:first-child {
color: blue;
}
</style>
</head>
<body>
<p>I am a <i>strong</i> man. I am a <i>strong</i> man.</p>
<p>I am a <i>strong</i> man. I am a <i>strong</i> man.</p>
</body>
</html>
<head>
<style>
p > i:first-child {
color: blue;
}
</style>
</head>
<body>
<p>I am a <i>strong</i> man. I am a <i>strong</i> man.</p>
<p>I am a <i>strong</i> man. I am a <i>strong</i> man.</p>
</body>
</html>
Try it yourself »
Match all <i> elements in all first child <p> elements
In the following example, the selector matches all <i> elements in <p> elements that are the first child of another element:Example
<html>
<head>
<style>
p:first-child i {
color: blue;
}
</style>
</head>
<body>
<p>I am a <i>strong</i> man. I am a <i>strong</i> man.</p>
<p>I am a <i>strong</i> man. I am a <i>strong</i> man.</p>
</body>
</html>
<head>
<style>
p:first-child i {
color: blue;
}
</style>
</head>
<body>
<p>I am a <i>strong</i> man. I am a <i>strong</i> man.</p>
<p>I am a <i>strong</i> man. I am a <i>strong</i> man.</p>
</body>
</html>
Try it yourself »
CSS - The :lang Pseudo-class
The :lang pseudo-class allows you to define special rules for different languages. |
Note: IE8 supports the :lang pseudo-class only if a <!DOCTYPE> is specified. |
|---|
Example
<html>
<head>
<style>
q:lang(no) {
quotes: "~" "~";
}
</style>
</head>
<body>
<p>Some text <q lang="no">A quote in a paragraph</q> Some text.</p>
</body>
</html>
<head>
<style>
q:lang(no) {
quotes: "~" "~";
}
</style>
</head>
<body>
<p>Some text <q lang="no">A quote in a paragraph</q> Some text.</p>
</body>
</html>
Try it yourself »
More Example for you..........
This example demonstrates how to add other styles to hyperlinks.
Use of :focus
This example demonstrates how to use the :focus pseudo-class.
Subscribe to:
Comments (Atom)